
Quality Guitar
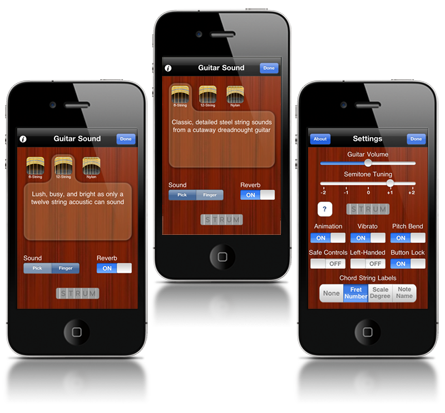
Whether it's six, twelve, or nylon strings (picked or plucked) GuitarStudio has the highest quality sound you'll find in any iOS app.

Comfy Control
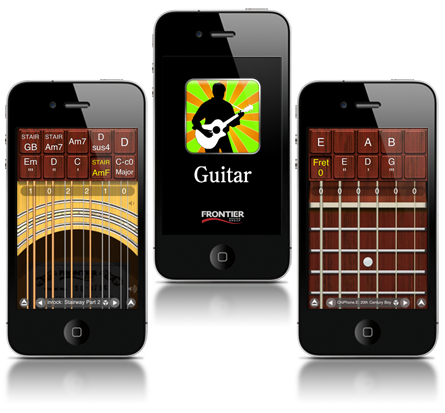
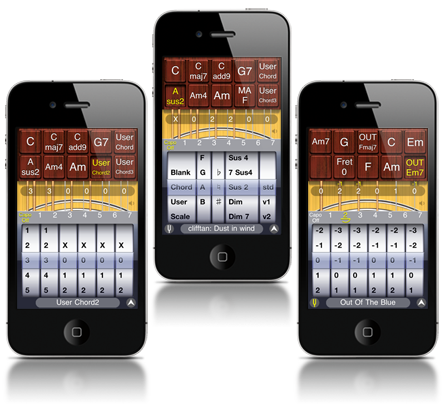
No chord fingering contortions required! Tap a button and the chord or fretboard is there, ready to strum or pick.

Your 15 Minutes
GuitarStudio has powered the biggest iPhone musicians and bands. Are you next? See GuitarStudio in action.

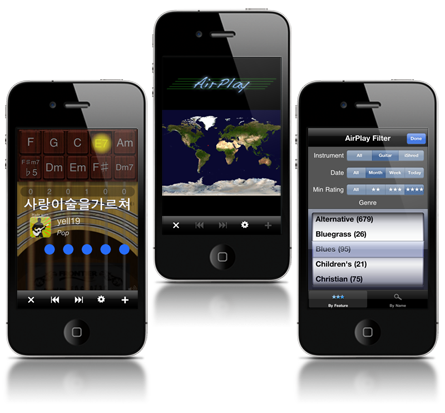
To the Clouds
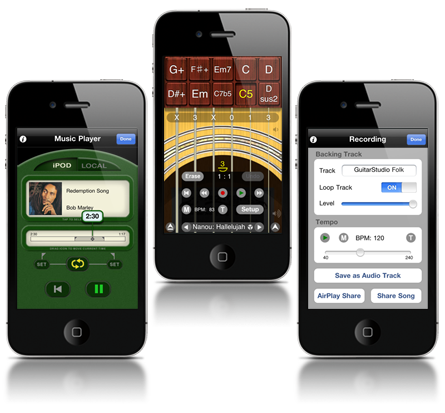
Built in network backup means you can avert disaster as well as share your songs with bandmates and friends.
Muito bom Eduardo - Argentina 
Eu testei varios e este é de longe o melhor simulador.
THE BEST GUITAR Mister_App_Guru - United States
This is the App that in my mind 'broke the sound barrier'. It outdistanced anything I had ever seen and would NEVER have believed possible back in the day. I have owned this since it came on the market and it still blows my mind. It really is THAT good!!
This is my favorite guitar app!!! Harpguitarplayer - United States
Easy to use. Well thought out. I'm recommending it to all my guitar buds
Awesome Piegonjin - United Kingdom
Like I said, awesome. Brilliant sound
More Flexible Than Plastic Man! Newtonia - United Kingdom
For what it does and the price this is da bomb! You can shove any chord imaginable into it.
Отличная прога Terbiyarchitectuvarium - Russia
Так же хороша как и электронный собрат!:) аккорд H независимо от того какой он - это B.
Good xiao.ma - China
对于中国用户,Guitarstudio呼声最高的是希望以后能出中文版!
Kanon! Henric O - Sweden
Riktigt bra guitarr app!!
Excellent chris - France
J'ai fait un mini concert avec hier soir, Appli vraiment bluffante, et vraiment jouable.
Wonderful app sambuddho roy - Norway
Brilliant app. One of the best around!:D
Review spintheguitar - United States
Very REAL sounding !! 10 stars. I plug into my pa for a few tunes While gigging and play the guitar on my phn. Crowd loves it !!!!
Awesome Kristal - United States
I'm new at playing guitar and this has helped me a lot when trying different chords. This is a must for aspiring guitar players.
Simply... Superdry - United Kingdom
Excellent writing tool!
Fantástico Leoduzzi - Brazil
Pesquisei varios softwates de simulação de instrumentos, e esse mata a pau. Se ligado a um som decente parece ate violão de verdade. O violão de 12 cordas então da um sonzão de arrepiar, vale cada centavo
Muy entretenida Chava Tei - Mexico
Les invito a descargar esta aplicacion, vale la pena si en verdad, ademas de ser muy entretenida.
Best of all guitar apps!! Ruben V. - United States
Pleased with this app. Works great!
Best guitar app pmusic77 - United States
This is the best guitar app for iPhone/iPod touch. I've tried so many guitar apps and this is the only one you can actually play musically and write songs on. If u are a guitarist you need to get this app!
Excelente BlackBirdMR - Brazil
Muito bem feito, reproduz os recursos do instrumento de forma muito criativa.
What more is there to say? Senrabad - United States
Everyone seems to agree and they're right! This is the most fun, most versatile, most playable guitar app around. Thanks.
Great App!!! Smoke563 - United States
If you play then this a great app! If you don't it can help u get started
Finally a playable Guitar app Hololeung - Hong Kong
I had purchased 3 gtr apps already and this one is finally playable! Thanks FDG!
READ THIS.... Jordan Rudes - United States
This is mind blowing. You can make music on this instrument quickly and easily. It is way beyond the other guitar apps for its ability to let you focus on music making without feeling like you are going against the technology! If you are a musician you will be smilling in moments after you load this in to your phone.
So Easy a Caveman Could Do It!!! Voyager01 - United States
I have ALL the guitar apps and this one is the easiest to actually play music on. Push a button and strum your chord. It don't get much easier than that. I love it.
Så jäkla bra app! Stefan - Sweden
Värd varenda krona :-)
Way Cool !!!! JZ6563 - United States
The sound and features are incredible for the price.
Strikes a chord with me nightthoughts - United Kingdom
Much as I like some of the others, this is my fave because you can line up all the chords in your song and then just strum away in your own style.
Lo mejor Antonio - Columbia
Es facil. Divertido, el sonido es muy bueno y es muy sencible al tacto.
Első osztályú Manitou9738473 - Hungary
Nagyon jól megcsinált program egy ekkorka kis eszközre. Még élvezni is lehet. :)
Sin palabras!!! k2o21 - Spain
Simplemente es espectacular.
Très bonne guitare sèche... Nico - France
virtuelle. Ne remplace pas une vrai, mais ça dépanne carrément bien! On ne perd plus une idée faute d'instrument, et on apprend de nouveaux accords...
Feeling groovy
GuitarStudio is a portable acoustic guitar app unlike any other. Beautiful sound wrapped in a highly playable interface means you can perform favorite songs or compose something new, no matter where you might be. Play using six string, twelve string, or nylon string sound packs, plucked or picked, even with a dash of reverb if you need it.
Anyone can play
No music experience required! Beginners will enjoy the included starter songs and easy accessibility of the playing interface. Six-string gurus will love the convenience of this portable music notepad, with tools to manage and backup songs, and even share with others.
Fine tuned
GuitarStudio provides a playing interface that's powerful and easy to learn. Create your songs from a huge library of over 2000 built-in chords, scales, and fret positions. Or create your own custom chords and tunings. Buttons provide immediate access to all the chords and scales you need for a song, making it easy to switch between strumming chords and playing melodies.
A world of music
Looking for inspiration or are you looking to share your music with the world? GuitarStudio features AirPlay with over four thousand shared songs from all around the world. Sit back and listen or download songs to learn. You can upload your own creations to AirPlay and let the world listen and rate it.